Building a Custom AppCompatCacheParser.exe

I’m still digging into the values found in my previous post (AppCompatCache Deep Dive) and as part of that, wanted to see the actual values being flagged, not just Yes for 01 00 and No for everything else. This is a bit of a side quest into doing that, but something I wanted to document for those like me that aren’t software developers.
There’s a few ways I could have extracted all these values. I know enough python scripting that I could have parsed the exported data myself, or these days ChatGPT could probably write 95% of a script for it. I believe there’s also an export to CSV function in 010 Editor once the template parses the data. However, we already have Zimmerman’s AppCompatCacheParser that is reading all these values, and thanks to him, it’s open source. I figured this was my best way forward, but as I said, I’m not a developer and it always takes me a bit to stumble through errors and figure out what packages I need to compile something.
Eric, if you read this, I apologize for what I’m about to do to your code.
Update:
Part 1 - https://nullsec.us/windows-10-11-appcompatcache-deep-dive/
Part 3 - https://nullsec.us/appcompatcache-part-3/
Environment setup
Grab Visual Studio Community 2022 from here: https://visualstudio.microsoft.com/vs/community/
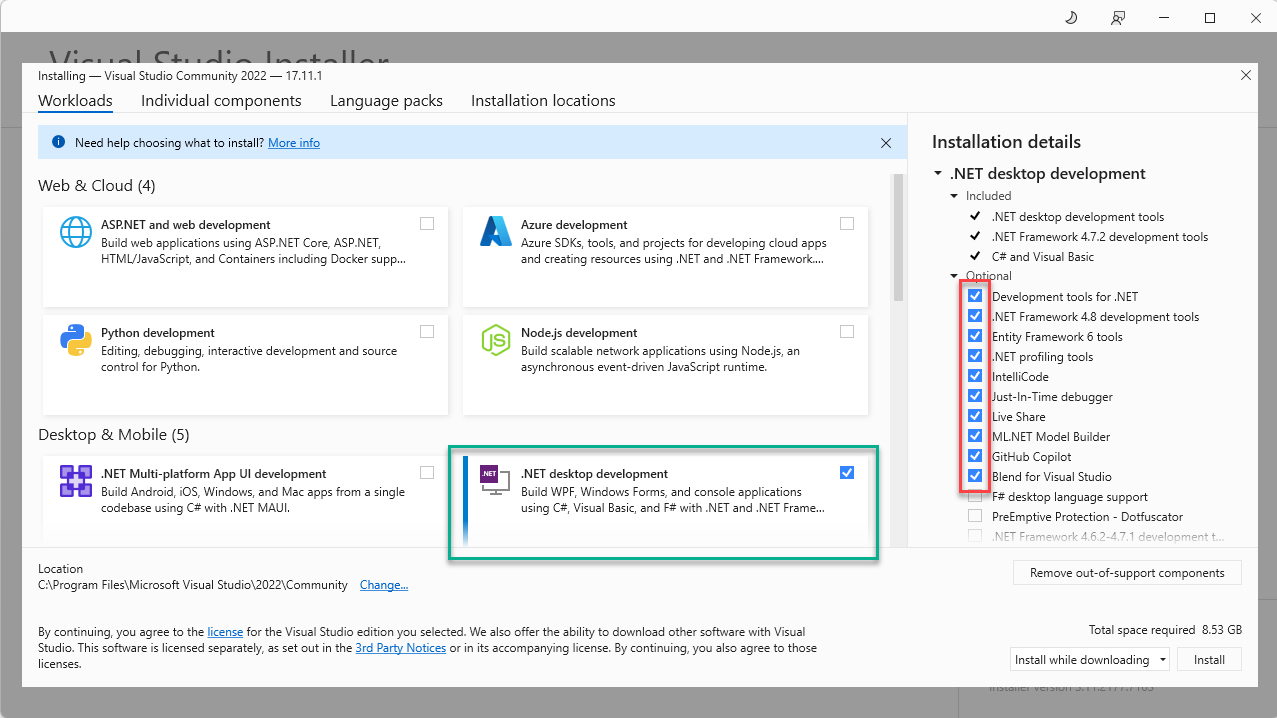
If we don’t install anything extra and try to open the .sln (Project Solution) file, Visual Studio will warn/inform you of what workloads you need to install. After this, there will be further errors for individual components. The below is the minimum I’ve found necessary to build AppCompatCacheParser, so start by adding the following.
- Install the “.NET desktop development” workload (inside the green square)
- You can remove the optional components on the right (red square) if you want to save some space/time
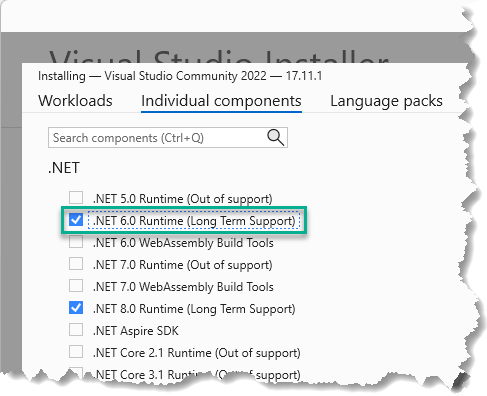
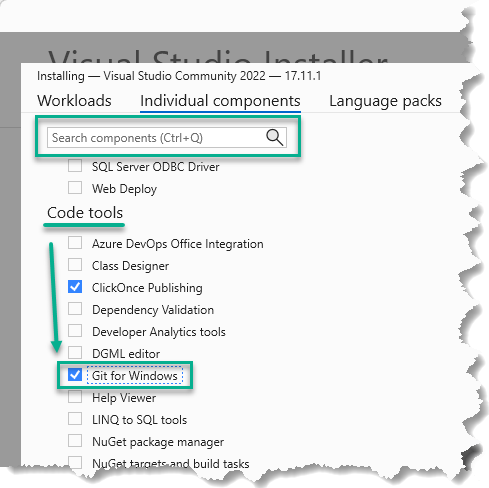
- Click the “Individual components” tab along the top and add the following:
- .NET 6.0 Runtime (Long Term Support)
- Git for Windows
Let the install complete, you’ll probably be asked to reboot.
Download AppCompatCacheParser Source
The latest source can be found here: https://github.com/EricZimmerman/AppCompatCacheParser
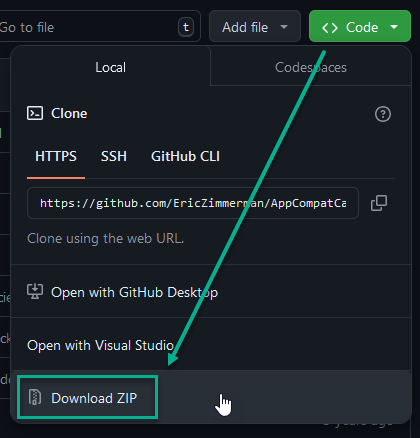
There’s proper ways to get the source, using Git and Visual Studio. We’re doing quick and dirty edits though, so downloading a zip works fine. Extract this once it’s downloaded.
Open in Visual Studio
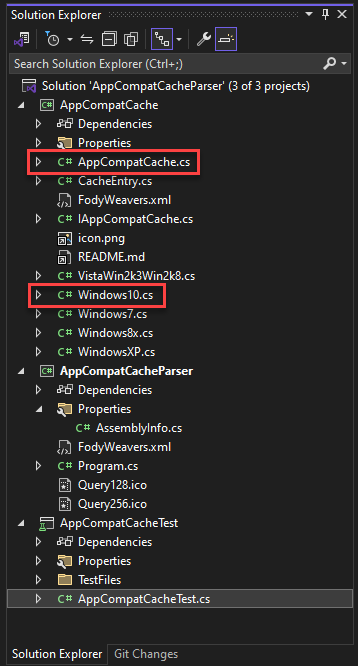
In VS, go to File -> Open -> Project/Solution, or press CTRL+SHIFT+O. Navigate to the extracted contents of the zip we just downloaded. At the top level, there will be a file named AppCompatCacheParser.sln . The project solution file (.sln) will load everything from the project, and you should now have a “Solution Explorer” pane to the right. You may have to expand the tree, but the two files we will be editing (highlighted in red below) are Windows10.cs and AppCompatCache.cs
Windows10.cs
We’re going to comment out line 80 to 86, and replace it with some logic that, instead of a simple Yes or No, sets an identifier for the value found. You can turn on line numbers by going to Tools -> Options -> Text Editor -> All Languages -> General, and checking “Line numbers” under Settings.
We’re taking the bytes that were previously converted to a 32 bit integer and used to set ce.Executed and doing a string comparison instead. For each string, we’ll be setting an identifier for that string that will replace the Yes/No/NA values in the final csv. Some of you might notice some inconsistencies here between the structure from velog.io, the way I parsed the data in my last post, and the way the code below parses it, as well as the identifiers I used. More on that in my next article.
I’m sure there’s a better way to do this, I would have loved to just set ce.Executed to the string value of that data section. I found that this was tied to an identifier though. Trying to modify that to a string value broke more things down the line. I found it was just easy to copy/paste and slightly change a bunch of else if statements and work inside the existing framework than make something new. As I said, this is quick and dirty and I am not a developer.
//if the last 4 bytes of Data is 1, it indicates execution
//var exec = BitConverter.ToInt32(ce.Data, ce.Data.Length - 4) == 1;

//ce.Executed = AppCompatCache.Execute.No;
//if (exec)
//{
//    ce.Executed = AppCompatCache.Execute.Yes;
//}

if (BitConverter.ToString(ce.Data, ce.Data.Length - 4).Contains("00-00-00-00"))
{
    ce.Executed = AppCompatCache.Execute._0000;
}
else if (BitConverter.ToString(ce.Data, ce.Data.Length - 4).Contains("01-00-00-00"))
{
    ce.Executed = AppCompatCache.Execute._0100;
}
else if (BitConverter.ToString(ce.Data, ce.Data.Length - 4).Contains("02-00-00-00"))
{
    ce.Executed = AppCompatCache.Execute._0200;
}
else if (BitConverter.ToString(ce.Data, ce.Data.Length - 4).Contains("4C-01-00-00"))
{
    ce.Executed = AppCompatCache.Execute._4c01;
}
else if (BitConverter.ToString(ce.Data, ce.Data.Length - 4).Contains("64-86-00-00"))
{
    ce.Executed = AppCompatCache.Execute._6486;
}
else if (BitConverter.ToString(ce.Data, ce.Data.Length - 4).Contains("64-86-4C-01"))
{
    ce.Executed = AppCompatCache.Execute._64864c01;
}
else if (BitConverter.ToString(ce.Data, ce.Data.Length - 4).Contains("4C-01-64-86"))
{
    ce.Executed = AppCompatCache.Execute._4c016486;
}
else
{
    Console.WriteLine(BitConverter.ToString(ce.Data, ce.Data.Length - 4));
    Console.WriteLine(ce.Path);
    ce.Executed = AppCompatCache.Execute.Unknown;
}
AppCompatCache.cs
Next, in AppCompatCache.cs , we are going to add the identifiers above to the Execute enumeration. Identifiers in C# must start with a letter or _, so I’ve just prepended all of mine with an _ , and added the Unknown that we’ll fall back to if nothing else is found. These are all the values that were found on my test system, if you find more, just add them as a new else if above, and add the associated enum identifier below.
public class AppCompatCache
{
    public enum Execute
    {
        Yes,
        No,
        NA,
        _0000,
        _0100,
        _0200,
        _4c01,
        _6486,
        _64864c01,
        _4c016486,
        Unknown
    }
Building
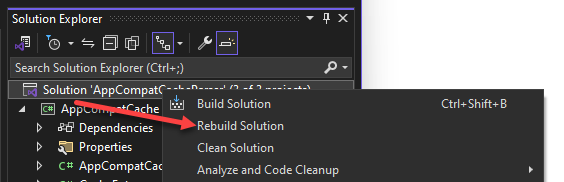
With our new code in place, we can right click on the top level solution in Solution Explorer and select Rebuild Solution. You can also go to the Build menu and select it there. Why Rebuild instead of Build? I don’t know. I found, as I was going through multiple edits, that Build (even after a clean) would not produce a binary with my newest changes, but Rebuild did.
You will probably get some warnings in the Output pane, mostly around git versioning and repository locations. None of this should actual cause a failure though. The last two lines should be:
========== Rebuild All: 3 succeeded, 0 failed, 0 skipped ==========
========== Rebuild completed at XX:YY AM and took 14.538 seconds ==========
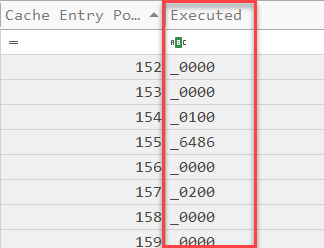
Navigate to [AppCompatCacheParser Parent Dir]\AppCompatCacheParser\bin\Debug\net6.0 and you should have a binary for AppCompatCacheParser.exe, Run this and you should get a CSV that indicates the actual “executed” values instead of just the Yes/No/NA.